Google Tag Manager: Installation and Basic Setup Guide
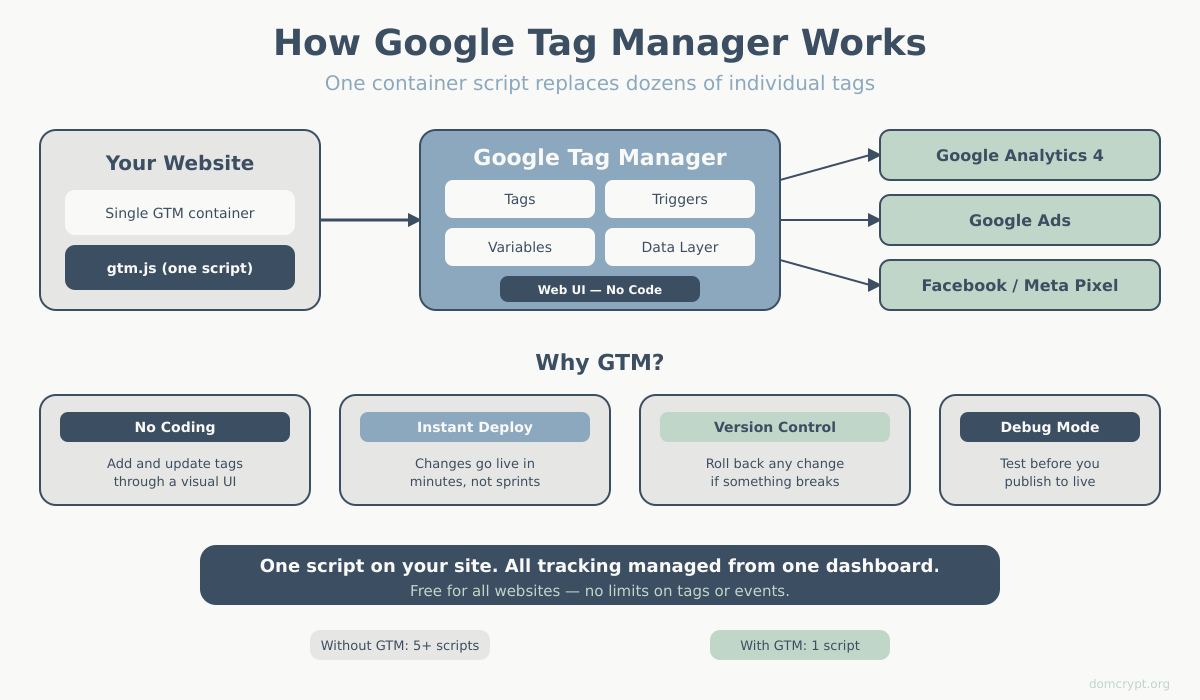
Google Tag Manager (GTM) is a free tool that lets you manage tracking codes without editing your website’s source code. Instead of asking developers to add scripts, you add them through a web interface — and they go live instantly.
Why Use Google Tag Manager?
- No coding required — add and update tags through a visual interface
- Faster deployment — changes go live in minutes, not development cycles
- Centralized management — all your tracking codes in one place
- Version control — roll back changes if something breaks
- Built-in debugging — test tags before publishing
If you only need basic GA4 tracking, you can install it directly. But if you plan to add conversion tracking, remarketing pixels, or custom events, GTM saves significant time.
Key GTM Concepts
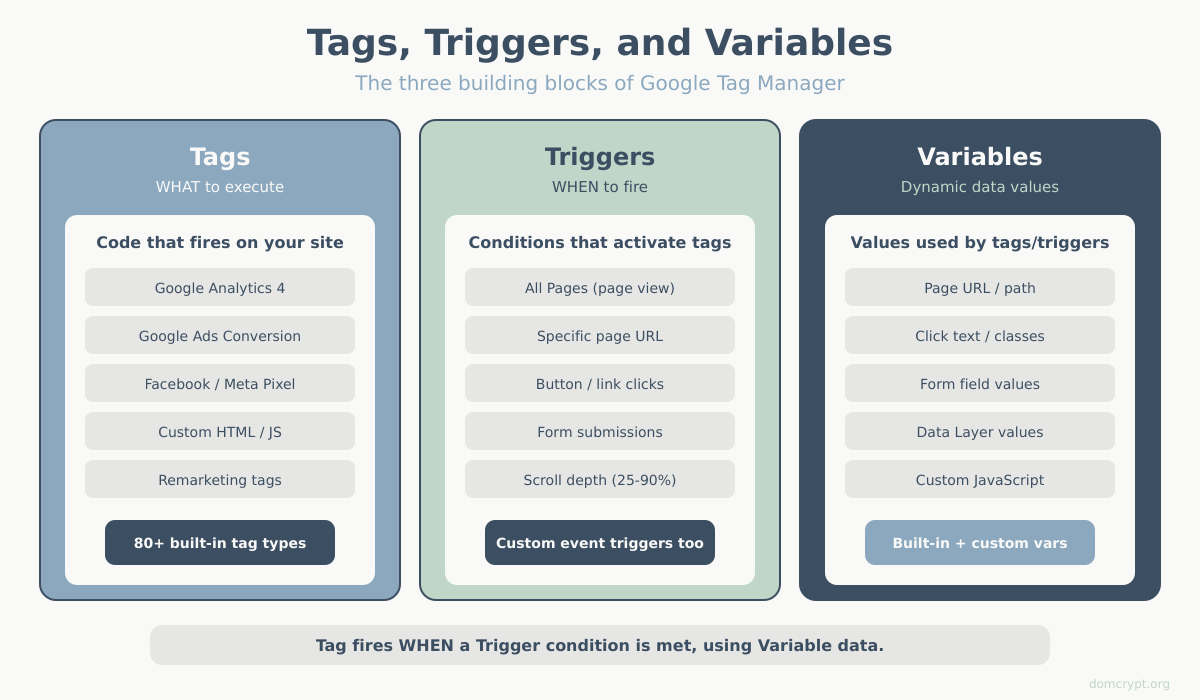
Before setup, understand these three components:
Tags
Code snippets that execute on your site. Examples:
- Google Analytics 4
- Google Ads conversion tracking
- Facebook Pixel
- Custom HTML/JavaScript
Triggers
Conditions that determine when tags fire. Examples:
- All page views
- Specific page (e.g., /thank-you)
- Button clicks
- Form submissions
- Scroll depth
Variables
Dynamic values used in tags and triggers. Examples:
- Page URL
- Click text
- Form field values
- Custom JavaScript values
Step 1: Create a GTM Account
- Go to tagmanager.google.com
- Click Create Account
- Enter your Account Name (company name)
- Select your Country
- Enter a Container Name (website URL)
- Select Web as the target platform
- Click Create
- Accept the Terms of Service
Step 2: Install GTM on Your Website
After creating the container, you’ll see two code snippets:
Snippet 1: Head Code
<!-- Google Tag Manager -->
<script>(function(w,d,s,l,i){w[l]=w[l]||[];w[l].push({'gtm.start':
new Date().getTime(),event:'gtm.js'});var f=d.getElementsByTagName(s)[0],
j=d.createElement(s),dl=l!='dataLayer'?'&l='+l:'';j.async=true;j.src=
'https://www.googletagmanager.com/gtm.js?id='+i+dl;f.parentNode.insertBefore(j,f);
})(window,document,'script','dataLayer','GTM-XXXXXXX');</script>
<!-- End Google Tag Manager -->
Place this: As high as possible in the <head> section.
Snippet 2: Body Code (Fallback)
<!-- Google Tag Manager (noscript) -->
<noscript><iframe src="https://www.googletagmanager.com/ns.html?id=GTM-XXXXXXX"
height="0" width="0" style="display:none;visibility:hidden"></iframe></noscript>
<!-- End Google Tag Manager (noscript) -->
Place this: Immediately after the opening <body> tag.
Platform-Specific Installation
WordPress
Option 1: Plugin (Recommended)
- Install GTM4WP or Insert Headers and Footers
- Enter your GTM Container ID (GTM-XXXXXXX)
- Save — the plugin handles placement
Option 2: Theme Files
- Edit header.php — add head code after
<head> - Add body code after
<body>
Shopify
- Go to Online Store → Themes → Edit Code
- Open theme.liquid
- Paste head code after
<head> - Paste body code after
<body> - Save
Squarespace, Wix
These platforms have built-in GTM integration:
- Squarespace: Settings → Advanced → Code Injection
- Wix: Settings → Custom Code
Step 3: Add Google Analytics 4 Tag
Now let’s add GA4 through GTM:
- In GTM, click Tags → New
- Name it “GA4 – Configuration”
- Click Tag Configuration
- Select Google Analytics: GA4 Configuration
- Enter your Measurement ID (G-XXXXXXXXXX)
- Click Triggering
- Select All Pages
- Click Save
Step 4: Preview and Test
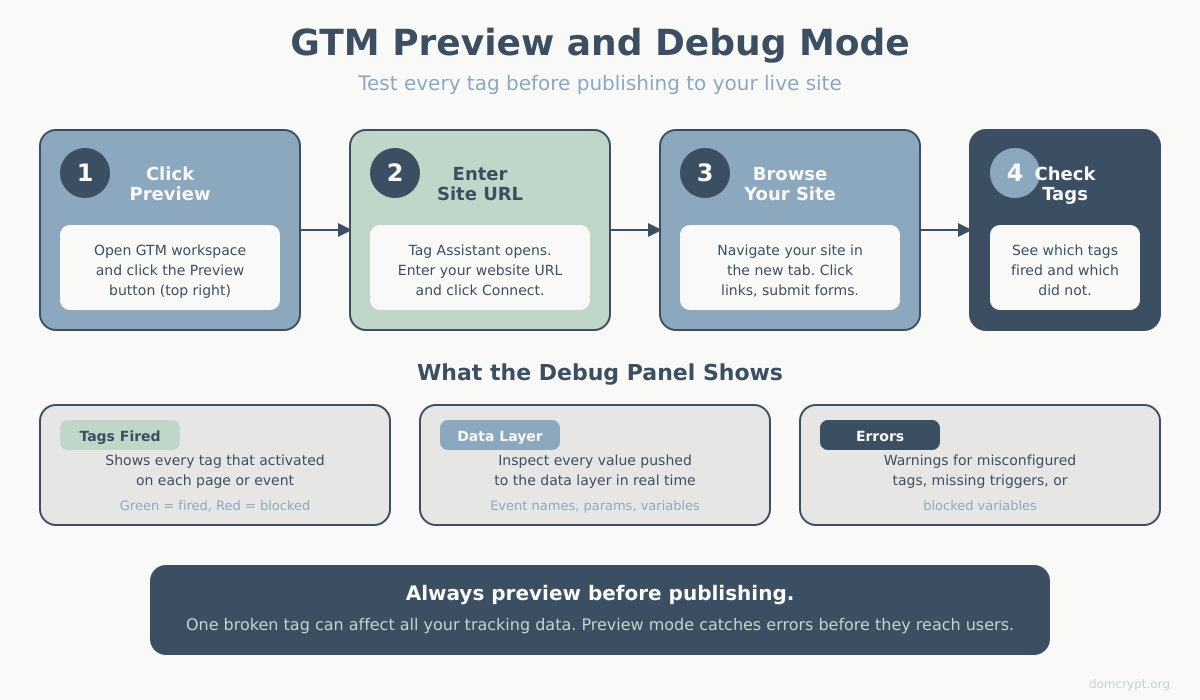
Before publishing, always test:
- Click Preview in the top right
- Enter your website URL
- Click Connect
Your website opens with the GTM debugger attached. You’ll see:
- Which tags fired
- Which triggers activated
- Variable values
- Data layer contents
Check that:
- Your GA4 tag shows “Fired” on page load
- No errors appear in the summary
Step 5: Publish Your Container
Once testing is complete:
- Click Submit in the top right
- Add a Version Name (e.g., “Initial GA4 Setup”)
- Add a Description of changes
- Click Publish
Your tags are now live on your website.
Common GTM Tags to Add
GA4 Event Tracking
Track specific actions (button clicks, form submissions):
- Create a new tag: Google Analytics: GA4 Event
- Select your Configuration Tag
- Enter the Event Name (e.g., “button_click”)
- Set trigger (e.g., Click – All Elements with conditions)
Conversion Tracking
Track goal completions:
- Create GA4 Event tag
- Event name: your conversion name
- Trigger: Page View on thank-you/confirmation page
Scroll Depth
Track how far users scroll:
- Enable built-in Scroll Depth variable
- Create trigger: Scroll Depth at 25%, 50%, 75%, 90%
- Create GA4 Event with scroll_depth parameter
GTM Best Practices
- Use naming conventions — “GA4 – Event – Button Click” not “Tag 1”
- Always preview before publishing — catch errors before they affect data
- Add version descriptions — helps when you need to roll back
- Use folders — organize tags by platform (GA4, Ads, Facebook)
- Document complex setups — future you will thank present you
Troubleshooting
Tags Not Firing
- Check trigger conditions are correct
- Verify GTM code is installed on the page
- Look for JavaScript errors blocking execution
Preview Mode Not Working
- Disable ad blockers
- Try incognito/private browsing
- Clear browser cache
Duplicate Data in GA4
- Check if GA4 is installed both directly AND via GTM
- Remove direct installation if using GTM
Summary
Google Tag Manager simplifies tracking management by letting you add, edit, and remove tags without touching website code. The basic setup takes about 15 minutes:
- Create GTM account and container
- Install the two code snippets on your site
- Add tags (starting with GA4)
- Preview and test
- Publish
Once GTM is running, adding new tracking — conversion goals, remarketing pixels, or custom events — becomes significantly easier. It also makes it simple to track the key website metrics that drive your business. For sites with multiple tracking needs, GTM is essential.